Flingbot was brought into this world for one purpose- to fling paint! This post details the design and engineering process behind this magnificent little robot. It goes into a little more detail than the YouTube video, which can be seen here:

I created Flingbot to solve an important problem…I want to make some paintings but I really dont like painting. Some mix of impatience and perfectionism combine forces to make it very hard for me to make it happen.
And let’s face it, I’m an engineer. So I figured I would design a robot to make paintings for me.

Unlike most robots, which are designed to do tasks in a predictable, repeatable way, flingbot was designed to do the complete opposite- Create completely unrepeatable, wildly unpredictable, works of art. This was achieved using a combination of mechanical parameters and code that randomly picks from these parameters. This meant the engineering process was focused on designing for each one of the parameters.
1: Fling Strength
Using a servo motor, Flingbot loads elastics at different forces to achieve different fling power levels. By randomly choosing an angle between 90-180, this parameter can be varied. Once the elastics are charged up, this motor releases the arm, allowing flingbot to do what it loves to do most.

2: Fling Angles
The next parameters are the starting and ending fling angles. Randomly chosen by the code, the trajectory and point it hits the canvas is variable creating another factor of uniqueness. This is all controlled by a servo under the base of the catapult, which also happens to be the motor that allows Flingbot to position itself under the paint reservoirs.

3: Paint Options
Designer Jay was really messing with Engineer Jay on this one when he decided there needed to be 12 different colours. That meant it needed to have 12 automated valves using 12 servo motors. To make it even more annoying for engineer jay, the accounting department recommended the cheapest motors on amazon, which consequently sucked and needed to be replaced by the bigger (but still sucky) cheap amazon servo motors. I really don't like doing things over and over again. It's safe to say there was quite a bit of procrastination required to convince myself to swap all 12 crappy valves with the redesigned ones.


But they ultimately worked, adding a large uniqueness characteristic to the whole system. You gotta do what you gotta do to complete the vision.
4: Paint Amount
Once Flingbot randomly chooses a colour, the next parameter is how much of the colour to grab. This is achieved by randomly choosing a time value for how long the the valve is open. (See code)
5: Colours per Throw
To add yet another factor to the mix, Flingbot can randomly choose between 1-3 colours per throw.
6: Throws Per Canvas
To add yet another factor to the mix, Flingbot randomly chooses how many total throws there are per canvas.
7: Scoop Profile
That leaves us with the final parameter- the scoop profile. I did some scientific experimenting to see the difference in paint trajectories caused by different scoop profiles-

After seeing the distinct fling patterns between the 2 shapes, I decided Flingbot needed a variable scoop. This meant I needed to create a flexible scoop. I 3d printed a mold and poured in silicone to create this unique paint flinging spatula.


Attaching it to a pivot, connecting some fishing line, and running it down the arm to a counterbalancing servo motor gives flingbot the capability to randomly select a scoop profile, adding the final degree of unpredictability to the system.


All in all, accounting for all the different paramenters, there are almost 3 trillion paintings that Flingbot can make. The number is likely even higher than this because there are even more variables to consider that are out of Flingbots control. These include the consistency of the paint, the angle of the canvas, the temperature in the room...the list goes on. It's safe to say that each one of Flingbot's painting is truly one of a kind.
Iterations on the Catapult Arm Design:
The catapult arm and scoop system were the only parts that needed real iteration. Originally the arm was much longer and I had printed it with solid sides under with the false assumption that the elastics would be strong enough to get the arm to fling. The fishing line connected to the scoop routed internally through the arm. The scoop servo was mounted on the axis of the catapult arm in an effort to neutralize its weight during the fling. I have to admit, I was quite proud of the design. But proud as I was, it certainly did not work :)

I shortened the arm, 3d printed without sides, and used a bunch of ball bearings to attempt to counterbalance the arm. I also drilled holes in the scoop to try to reduce some of the weight:
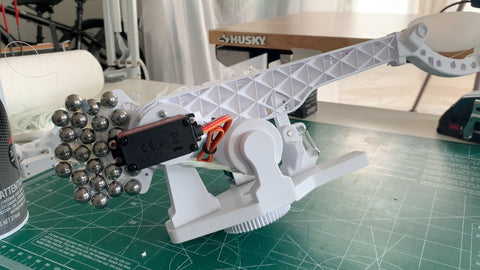
This is the final design, with the scoop servo used as the counterbalance instead of the ball bearings. I also gave the arm a truss-style design, and added the blue servo onto the side to give the arm a way to be reset:


Serial.println("Time to create a masterpiece!");
int i = 0;
randomSeed(analogRead(0));
numberOfThrows = random(4, 7);
Serial.print("Total Number of Throws in this Masterpiece: ");
Serial.println(numberOfThrows);
Serial.println("_____________________________________________________");
while (i < numberOfThrows) //MAIN WHILE STATEMENT
{
randomSeed(analogRead(0));
Serial.print("Throw #"); Serial.println(i + 1);
//Determine # of colours in this throw
int coloursInThrow = random(1, 4);
Serial.print("Total Colours in throw: "); Serial.println(coloursInThrow);
//Pick the Colours and Add them to the register
int pick = 0;
while (pick < coloursInThrow)
{
randomSeed(analogRead(0));
colourRegister[pick] = random(1, 13);
if (pick >= 1)
{
while (colourRegister[pick] == colourRegister[pick - 1])
{
randomSeed(analogRead(0));
colourRegister[pick] = random(1, 13);
}
}
Serial.print("Colour "); Serial.print(pick + 1); Serial.print(": ");
Serial.println(colourRegister[pick]);
pick++;
}
//Find the adjusted max delay value based on colours in throw
int adjustedMaxDelay = maxDelay / coloursInThrow;
//Collect Paint
int j = 0;
while (j < coloursInThrow)
{
//move to colour
int colourVal = colourRegister[j];
Serial.print("Moving to colour "); Serial.println(colourVal);
servoWrite(rotateServo, colourAngles[colourVal], 200);
int rotationDelay = abs(colourAngles[colourVal] - lastRotationAngle) * 60;
lastRotationAngle = colourAngles[colourVal];
Serial.print("Rotation Delay: "); Serial.println(rotationDelay);
delay(rotationDelay);
//open valve
Serial.print("Opening Valve: "); Serial.println(colourVal);
openValve(colourVal);
//wait for colour amount
randomSeed(analogRead(0));
int randomDelay = random(minDelay, adjustedMaxDelay + 1);
Serial.print("Filling for "); Serial.print(randomDelay / 1000.0); Serial.println(" seconds");
delay(randomDelay);
//close valve
Serial.println("Closing Valve");
closeValve(colourVal);
//wait for drip
Serial.println("Drip drip");
delayWithDots(0.5);
j++;
}
//Get Ready to Fire
Serial.println("***** Getting Ready to Fire *****");
randomSeed(analogRead(0));
int fireAngleStart = random(78, 96);
//randomSeed(analogRead(0));
int fireAngleEnd = random(78, 96);
int fireRotateSpeed = random(1000, 3000);
int fireAngleScoop = random(30, 175);
int scoopSpeedVal = random(1000, 3000);
Serial.print("Moving to fire Angle: "); Serial.println(fireAngleStart);
Serial.print("(End Angle/Speed: "); Serial.print(fireAngleEnd);
Serial.print("/"); Serial.print(fireRotateSpeed); Serial.println(")");
Serial.print("(End Scoop Angle/Speed: "); Serial.print(fireAngleScoop);
Serial.print("/"); Serial.print(scoopSpeedVal); Serial.println(")");
servoWrite(rotateServo, fireAngleStart, 200);
delay(2000);
randomSeed(analogRead(0));
int flingPower = random(110, 170);
Serial.print("Loading Catapult with Power: "); Serial.println(flingPower);
servoWrite(flingServo, flingPower, 2000);
delay(2000);
//For highspeed camera - wait for serial input before throwing
//while(!Serial.available() ){ }
//while(Serial.available() == 0){}
Serial.println("FIRE IN THE HOLE");
releaseTheArm();
servoWrite(rotateServo, fireAngleEnd, 1000);
servoWrite(scoopServo, fireAngleScoop, scoopSpeedVal);
delay(1000);
servoWrite(rotateServo, 87, 1000); //Return to middle Position
lastRotationAngle = 87;
servoWrite(scoopServo, 30, 1000); //Return to neutral Scoop Position
Serial.println("Waiting for scoop to empty");
delayWithDots(4.0);
Serial.println("Resetting Arm");
if (i != numberOfThrows) {
resetArm();
}
delayWithDots(2.5);
Serial.readStringUntil('\n');
i++;
}//End of main while statement
Serial.println("Masterpiece Complete!!");
Serial.println("_____________________________________________________");
Serial.println("_____________________________________________________");
}
void delayWithDots(float delayAmount)
{
int delayCount = delayAmount / 0.5;
//Serial.println(delayCount);
while (delayCount >= 0 )
{
delay(500); Serial.print(".");
delayCount--;
}
Serial.println();
}